Monday, March 25, 2013

OWH Sketch Challenge #163


Operation Write Home is a worthy cause for card-makers to help bless our troops and their families. For more information, please click the name link!

Each week, OWH has neat activities to keep card makers encouraged and moving forward.  I prefer Sandy's OWHtv Thursday night show and the sketch challenges.  Sometimes I only have time to make a simple version of the sketch (like this time) but I do try to get them in.

Here is the sketch for the March 10th Sketch Challenge (#163)


You can find the entire challenge post HERE.

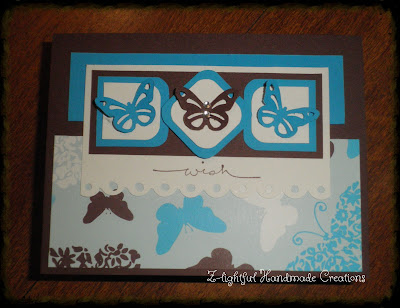
And here is my version...


This card-front is nearly ready to go.  I need to affix it to a card base, stamp the back and tuck into an envelope.  I only have one sheet of this brown (it's so thick and yummy) so am playing around making a similar sketch card with it, just a tad different. 

Please forgive the quality of the photo, it's late and I had a full day, lol.

Supplies:
Cardstock ~ Unknown from stash, butterflies - The Paper Studio
Basics (paper cutter/trimmer, corner rounder, tape runner, popdots)
"wish" - Stampin' Up!
Ink - Chocolate Chip, Stampin' Up!
Butterfly Punch - Martha Stewart
Scalloped Eyelet Border Punch - American Crafts, Knock Outs
2 Rhinestones
Glossy Accents (to affix butterflies and rhinestones)

Have a fabulously creative week!

Saturday, October 6, 2012

Pink and Ruffly!!!

Hi all!  Thanks for you patience as I continue to work through issues here and also try to get my projects listed.  :) 

Here's an order I had last Christmas.  My friend was looking for something for her niece and we wanted ruffles and ribbons, buttons and bows.  And of course it HAD to be pink!  :)


These were two different pieces that we made in matching yarn (patterns were not part of a set). 

The first piece made was the scarf.  The pattern is called, Ruffled Double Scalloped Scarf Crochet Pattern and can be found HERE.  It's $3.99 for the download. 

The hat, I'm sorry to say is a beanie but I did not get the pattern name written down in my notebook/computer files and so I cannot remember what it was.  :(    The flower was a separate component and once more, I didn't get the name.  I will go look to see if I can find the names for both at a future date.

The button I had on hand and the ribbon I purchased at Hobby Lobby, both sizes.

The yarn used for this project was Bernat Satin in Flamingo.  It was a promo color for the "pink" breast cancer promotion which my friend and I were able to get at a discount after October!  :)

The scarf pattern was really neat because you could make it as long as the person, so you can make this for anyone and it will be a good length for them.  :)

Here are some close-ups for you to enjoy!


More projects to come and when time allows will look up the hat and flower pattern!  :)

Hugs,
Tamara


Thursday, May 10, 2012

Wow!   It's sure been busy around here and I apologize for being a slacker blogger, but once I start getting all the crafts up here, I think you'll understand I've been busy doing and not being lazy, lol.  It's spring and that means cleaning, decluttering, crafting, gardening and all kinds of fun things, around here.  What have you been up to?

As mentioned, there are an abundance of projects I have to share with you all, and will get them up as time allows.  Here's one of the most recent.

Dolly Diaper Bag


I belong to a group of wonderful ladies who are making doll items each month so they will have an entire set of items to donate to some precious little girl at the end of the year.  Most of the things they do are swaps.  The April swap was to make a dolly diaper bag for them to put all their handmade goodies inside (and include three 3" prayer squares to go into the dolly blanket).  I was so blessed to gift to a new friend, Bekah, and appreciate her sharing her photos with me and the group as well.

For this project, I decided to kill two birds with one stone and used a Pinterest pin as inspiration.  The original website it came from is Mommy By Day/Crafter By Night and you can read about her inspiration and get the FREE PATTERN for this project HERE!

As you can see (after you visit her blog), I made a couple of little changes.  I didn't use fusible fleece, instead chose a sturdy interfacing for the fabric.  I also decided to add some fun little pockets.  There are two pockets on the front and two on the back (both with ruffle).  To make these, I cut 2 pieces of the complimentary fabric in 8x11" size and folded them in half to fit the length.  Then I cut 2 extra straps and using a bias stitch, I ruffled them up.  I did sew these to the pockets before I attached the panel and interfacing.  Then when that "piece" was finished, I stitched the lines for the pockets, from top to ruffle, then from ruffle to bottom (so, after I stitched the panel pieces with interfacing, but BEFORE I put all the pieces together to make the bag shell).

Here are two more pics to enjoy!  It was such an easy project to complete and I hope that if you have "little mommies" in your life that you can find the time to whip up one of these delightful dolly diaper bags.


 So, keep enjoying your crafts and I hope you can share something soon.  I'll have a bunch to share in the near future!

Keep Craftin'!
Tamara